
In the lab book you will see the following for a step.
“Take a screen shot of the message box by pressing Alt+Prt Scr and paste it into your LabO3_worksheet file in the page provided by pressing Ctrl+V”
Instead of using the Alt+Prt Scr you will use the Sinpping tool that is part of the Windows 7 operating system.
Before you start the Snipping tool make sure the desktop is showing the information you are to copy and then paste into the worksheet.
You will find the Snipping tool in All programs/Accessories/Snipping Tool.
When you start the Snipping tool the following window will appear.
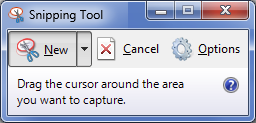
The desktop will lighten and a hollow cross hair will appear.
The directions say to “Drag the cursor around the area you want to chapture.
Mover the cursor to one corner of a box that will enclose the whole part of the screen you want to capture.
Hold down the left mouse button and drang out a box over the area you want to capture.
Release the left mouse button when you have the area selected. The following dialog box will appear with the area you selected inside of the snipping tool box..

You can either
copy
Or
save
the image you have captured.
If you copy go to the lab worksheet and using Ctrl + C paste it in the area below the place indicated for the image.
If you save the captured image to your USB drive you can later paste it into the worksheet.
Once we get beyond lab 3 you might want to pin the Snipping tool to the task bar.
Date modified 12-
| CIS 112 Home Page |
| CIS 114 Home Page |
| CIS 147 Home Page |
| CIs 215 Home Page |
| CIS 221 Home Page |
| CIS 230 Home Page |
| CIS 112 Class Calendar |
| Using the D2L Dropbox System |
| Educational Goals and Objectives |
| Projects |
| Using the D2L System |
| Project 3 Excel |
| Project 4 Working with Images |
| Project 5 Creating a Slide Presentation |
| Project 6 Creating a Publication |
| Project 8 Making a Movie |
| Adding Information to a Cell |
| Using Formulas |
| Formattin the Spreadsheet |
| Project 3 Excel Spreadshett |
| Starting PowerPoint |
| Adding New Slides |
| Adding Content to a Slide |
| Slide Transitions |
| Animating Slide Content |
| Introduction to Publisher |
| Working with Word Art |
| Creating Text Boxes |
| Inserting Images |
| WindowsMovieMaker |
| CIS 114 Calendar |
| Basic Pacasa Manual |
| Class Projects |
| Working with Folders |
| Renaming a File |
| Copying and Moving Picture Files |
| Organizing Pictures |
| Cropping PIctures |
| Lesson 1 Introduction to Web Plus X5 |
| Lesson 2 Working with Text |
| Lesson 3 Images |
| Lesson 4 Hyperlinks |
| Lesson 5 Final Project |
| Saving and Opening Documents |
| Using the D2L Dropbox System |
| Introduction to WebPlus X6 |
| Setting Up For Publishing |
| Publishing Your Web Site |
| Creating a New Web Site |
| Working With Text |
| Project 2 Text |
| Sample Text Page |
| Saving Image from a Web Page |
| Saving Images from a Image Search |
| Project 3 Images |
| Image Sample Page |
| Project 4 Navigation |
| Hyperlink Example Home Page |
| External Web Pages |
| Personal Photos |
| Contacting Me |
| Lesson 1 Digital Data |
| Lesson 2 Text |
| Lesson 3 Graphics |
| Lesson 4 Sound |
| Lesson 5 Video |
| Sample Text Page |
| CIS 221 Day Calendar |
| Accessing the D2L System |
| Using the D2L Dropbox System |
| Using the Snipping Tool |
| CIS 230 Day Class Calendar |
| CIS 221 Day Calendar |
| Accessing the D2L System |
| Using the D2L Dropbox System |
| Using the Snipping Tool |