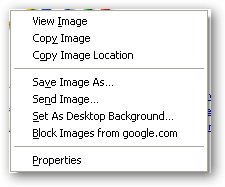
The images on many web pages can be saved on your computer and used in classroom materials. You should be careful when using well recognized images for use on web sites you create as there may be copyright issues with their use. To capture an image your right clicks on it. The following menu will appear.

Click on the Save Image As command.
Note:
This command may be worded slightly different and/or be in a different place depending on the Browser you are using.
The Save as dialog box will appear. You should navigate to the folder you want to save the image in.
You can also create a new folder using the New Folder button at the top right of the Save As dialog box.
I like to go to the My Pictures folder in the My Documents folder and inside the my pictures folder create a folder for the images and graphic I am downloading for a specific project.
In some cases when you right click on an image the Save Image As command my be grayed out. When a command is grayed out that means it is not available for use and in this case you can not save the image.
The Snipping Tool
Windows 7 comes with a Snipping tool. This tool can cut content from an open application and save the content as an image. To find the snipping tool go to Start, All Programs, Accessories and click on Snipping tool. Directions for using this tool are found when you start this App.
Date modified 12-
| CIS 112 Home Page |
| CIS 114 Home Page |
| CIS 147 Home Page |
| CIS 221 Home Page |
| CIS 112 Class Calendar |
| Using the D2L Dropbox System |
| Educational Goals and Objectives |
| Projects |
| Using the D2L System |
| Project 3 Excel |
| Project 4 Working with Images |
| Project 5 Creating a Slide Presentation |
| Project 6 Creating a Publication |
| Project 8 Making a Movie |
| Adding Information to a Cell |
| Using Formulas |
| Formattin the Spreadsheet |
| Project 3 Excel Spreadshett |
| Starting PowerPoint |
| Adding New Slides |
| Adding Content to a Slide |
| Slide Transitions |
| Animating Slide Content |
| Introduction to Publisher |
| Working with Word Art |
| Creating Text Boxes |
| Inserting Images |
| WindowsMovieMaker |
| CIS 114 Calendar |
| Basic Pacasa Manual |
| Class Projects |
| Working with Folders |
| Renaming a File |
| Copying and Moving Picture Files |
| Organizing Pictures |
| Cropping PIctures |
| Lesson 1 Introduction to Web Plus X5 |
| Lesson 2 Working with Text |
| Lesson 3 Images |
| Lesson 4 Hyperlinks |
| Lesson 5 Final Project |
| Saving and Opening Documents |
| Using the D2L Dropbox System |
| Introduction to WebPlus X6 |
| Setting Up For Publishing |
| Publishing Your Web Site |
| Creating a New Web Site |
| Working With Text |
| Project 2 Text |
| Sample Text Page |
| Saving Image from a Web Page |
| Saving Images from a Image Search |
| Project 3 Images |
| Image Sample Page |
| Project 4 Navigation |
| Hyperlink Example Home Page |
| External Web Pages |
| Personal Photos |
| Contacting Me |
| Adding a Navigation Bar |
| Adding Pages to a Nav Bar |
| CIS 221 Day Calendar |
| CIS 221 Night Calendar |
| Accessing the D2L System |
| Using the D2L Dropbox System |
| Using the Snipping Tool |
| Saving Image from a Web Page |
| Saving Images from a Image Search |
| Project 3 Images |
| Image Sample Page |