
A text box is an area in a publication where you can type and copy text. To create a text box in your publication go to the Insert tab and click on Draw Text Box button
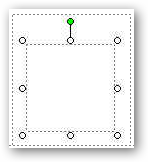
Eight handles will appear around the edge of the text box, and one green colored handle will appear above the center top handle. The eight handles attached to the box allow you to change the size of the box. The green handle lets you rotate the box.
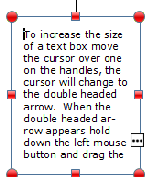
To increase the size of a text box move the cursor over one on the handles, the cursor will change to the double headed arrow. When the double headed arrow appears hold down the left mouse button and drag the handle, you will see the size of the box increase.
To move the text box on the page move the cursor over the edge of the text box in an area where there is no handle. You will see a four headed arrow appear. Hold down the left mouse button and drag the text box on the page.
If you see a text box with this symbol that indicates that there is more text then the text box can hold. To correct this make the text box bigger with one of the handles.

Move the arrow over the work arear. As you do this the arrow will change to a cross hair. Move to the point where you want the text box to start and hold down the left mouse button. While holding the left mous button draw out a text box. When you have created the text box release the left mouse button and the text box will appear. Do not worry if it is not the exact size you can adjust it.
Date modified 10-
| CIS 112 Home Page |
| CIS 114 Home Page |
| CIS 147 Home Page |
| CIs 215 Home Page |
| CIS 221 Home Page |
| CIS 230 Home Page |
| CIS 112 Class Calendar |
| Using the D2L Dropbox System |
| Educational Goals and Objectives |
| Projects |
| Using the D2L System |
| Project 3 Excel |
| Project 4 Working with Images |
| Project 5 Creating a Slide Presentation |
| Project 6 Creating a Publication |
| Project 8 Making a Movie |
| Adding Information to a Cell |
| Using Formulas |
| Formattin the Spreadsheet |
| Project 3 Excel Spreadshett |
| Introduction to Publisher |
| Working with Word Art |
| Creating Text Boxes |
| Inserting Images |
| WindowsMovieMaker |
| CIS 114 Calendar |
| Basic Pacasa Manual |
| Class Projects |
| Working with Folders |
| Renaming a File |
| Copying and Moving Picture Files |
| Organizing Pictures |
| Cropping PIctures |
| Lesson 1 Introduction to Web Plus X6 |
| Lesson 2 Working with Text |
| Lesson 3 Images |
| Lesson 4 Hyperlinks |
| Lesson 5 Final Project |
| Saving and Opening Documents |
| Using the D2L Dropbox System |
| Introduction to WebPlus X6 |
| Setting Up For Publishing |
| Publishing Your Web Site |
| Creating a New Web Site |
| Working With Text |
| Project 2 Text |
| Sample Text Page |
| Saving Image from a Web Page |
| Saving Images from a Image Search |
| Project 3 Images |
| Image Sample Page |
| Project 4 Navigation |
| Hyperlink Example Home Page |
| External Web Pages |
| Personal Photos |
| Contacting Me |
| Lesson 1 Digital Data |
| Lesson 2 Text |
| Lesson 3 Graphics |
| Lesson 4 Sound |
| Lesson 5 Video |
| Sample Text Page |
| CIS 221 Day Calendar |
| Accessing the D2L System |
| Using the D2L Dropbox System |
| Using the Snipping Tool |
| CIS 230 Day Class Calendar |
| Introduction to Publisher |
| Working with Word Art |
| Creating Text Boxes |
| Inserting Images |