

When ever you edit a image you must first copy it to a separate folder where you are actually going to do the editing. This protects the original image from any changes you make to it. Refer to your individual class projects to determine what to call the folder for your project.
Creating A New Editing Folder
The first step is to create a new folder and give it a name that makes sense for the the cropping and editing of the specific photo (example edited images from spring trip) click on the link to Working with Folders. When you look at the process of creating a new folder you must select a photo to place in that folder. When you do this the photo is moved from its original folder to that new folder. To make sure that the original is protected you must copy it from the new editing folder you have just created back to the folder it was originally in. To do this click on the link to Copying and Moving Picture files. Review the section that explains how copy an image.
Once you have copied the original photo back to it’s original folder you can begin the process of cropping the image.
Cropping a Photo
Cropping is the process of taking parts of the photo to improve its composition. To crop an image in Picasa do the following
Go to the editing folder and double click on the photo and what I like to call the editing window will open. On the left side you will see the following tabs.
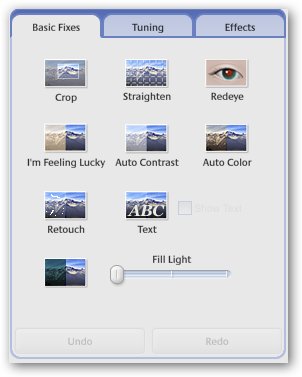
This area provides you with the basic fixes that can be done to a photo, a fine tuning section and a section that allows you to create simple special effects on your original photo.
To start the cropping process click on the crop button.

When you click on the crop button the basic fixes area will look like the image below.

Notice that it gives you the directions on how to do the cropping process
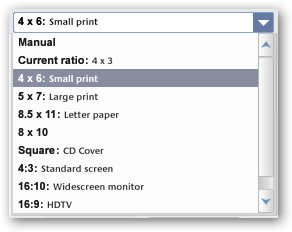
To see all of the possible crop selections click on the down arrow next to the box, you will see the following list.
Once you have selected the size of crop, move the pointer over the photo and holding down the left mouse button drag out a box to indicate the cropping area of the photo. Your photo will look like the one below with the cropping area defined.
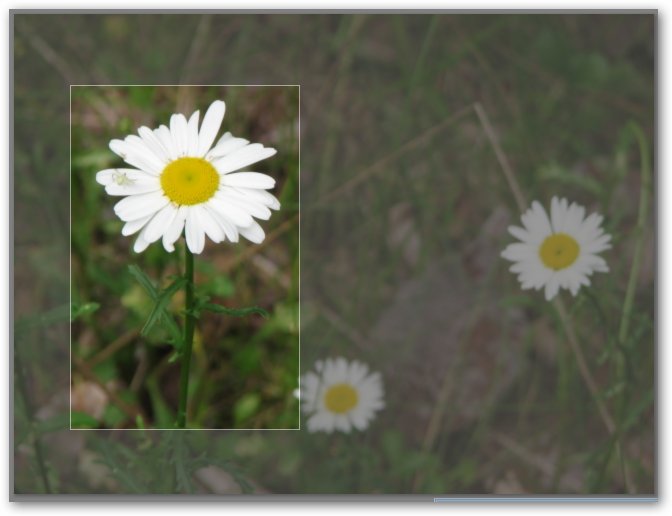
Once you have the cropping area defined (the clear area of the photo), you can move it around and resize it to achieve the best possible composition.
If you use a pre-
If you want complete control over the size of the crop area you would choose the Manual cropping option. But remember if you choose manual you photos may not print full size on standard photo papers.
Once you have created the cropping area on the photo the bottom half of the left side will change and look like the image below.
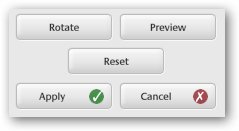
Preview will show you how the crop will look and then go back to the full picture with the crop displayed.
Rotate rotates the crop box 90˚
Reset starts the cropping process over.
Apply When you click on the apply button the Crop will be applied to the image and will be displayed in the image area.
Note that when you click on apply the Basic fix area reverts back to Basic Fix tab main screen
and a button appears that Allows you to Undo the Crop
Cancel takes you back to the Basic Fix tab main screen
Once you created a crop of the picture and are happy with it you should save that crop as a separate photo. This will allow you to permanently keep the crop of the photo so you can use it again. To do this;
Complete the cropping of the photo.
From the file menu select Save As....
The Save As dialog box will appear. Make sure that you are in the editing folder where you placed the photo to be edited.
The current file name should appear in File name box. Just modify the current name to indicate What size crop it is and click Save.
One last thing you must do is click on the Undo Crop button so that you can do more editing work on the original photo.
Cropping Pictures