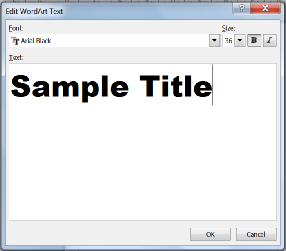
Enter your text in the box and click OK. Your WordArt will appear on the page.Note that there is no spell check so make sure your spelling is correct.

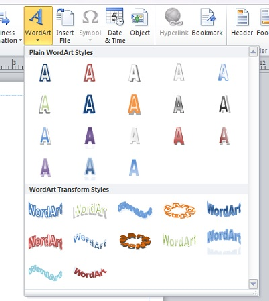
WordArt is used to produce creative heading for publications. To start working with WordArt on the Insert tab click on the WordArt button.
The following window will open.

When you click on any of the styles the following dialog box will open.


With the word art selected, the WordArt tool bar will appear at the top of the page. Use this tool bar to modify the WordArt you created.

You can change the WordArt style, using the style menu.

You can fill the letters with shape fill.
You can change the outline color with shape outline.

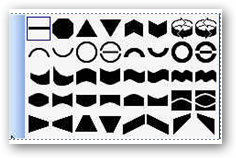
You can change the shape of the EordArt with Change Shape
When you click on Change Shape the following list will open. Click on any of the shapes to chant the selected WordArt.

You can add shadow effects by clicking on the Shadow Effect button and choosing an effect.
There are many other iffect that you can add to your WordArt, so play with the WordArt system.
Date modified 10-

| CIS 112 Home Page |
| CIS 114 Home Page |
| CIS 147 Home Page |
| CIs 215 Home Page |
| CIS 221 Home Page |
| CIS 230 Home Page |
| CIS 112 Class Calendar |
| Using the D2L Dropbox System |
| Educational Goals and Objectives |
| Projects |
| Using the D2L System |
| Project 3 Excel |
| Project 4 Working with Images |
| Project 5 Creating a Slide Presentation |
| Project 6 Creating a Publication |
| Project 8 Making a Movie |
| Adding Information to a Cell |
| Using Formulas |
| Formattin the Spreadsheet |
| Project 3 Excel Spreadshett |
| Introduction to Publisher |
| Working with Word Art |
| Creating Text Boxes |
| Inserting Images |
| WindowsMovieMaker |
| CIS 114 Calendar |
| Basic Pacasa Manual |
| Class Projects |
| Working with Folders |
| Renaming a File |
| Copying and Moving Picture Files |
| Organizing Pictures |
| Cropping PIctures |
| Lesson 1 Introduction to Web Plus X6 |
| Lesson 2 Working with Text |
| Lesson 3 Images |
| Lesson 4 Hyperlinks |
| Lesson 5 Final Project |
| Saving and Opening Documents |
| Using the D2L Dropbox System |
| Introduction to WebPlus X6 |
| Setting Up For Publishing |
| Publishing Your Web Site |
| Creating a New Web Site |
| Working With Text |
| Project 2 Text |
| Sample Text Page |
| Saving Image from a Web Page |
| Saving Images from a Image Search |
| Project 3 Images |
| Image Sample Page |
| Project 4 Navigation |
| Hyperlink Example Home Page |
| External Web Pages |
| Personal Photos |
| Contacting Me |
| Lesson 1 Digital Data |
| Lesson 2 Text |
| Lesson 3 Graphics |
| Lesson 4 Sound |
| Lesson 5 Video |
| Sample Text Page |
| CIS 221 Day Calendar |
| Accessing the D2L System |
| Using the D2L Dropbox System |
| Using the Snipping Tool |
| CIS 230 Day Class Calendar |
| Introduction to Publisher |
| Working with Word Art |
| Creating Text Boxes |
| Inserting Images |