
Creating a Video Using Windows Movie Maker
Windows Movie Maker is a free program that comes with the Windows operating system. Movie maker will teach you all of the basic steps to create your own videos. It is not as sophisticated as video production application that you can purchase, but is does do a good job at producing videos and will teach you the fundamental of the process.
To start Movie Maker in the classroom:
Click on the start button
Click on All Programs
Click on Accessories
Locate the MoveMaker application.
The Movie Maker window looks like the one below.
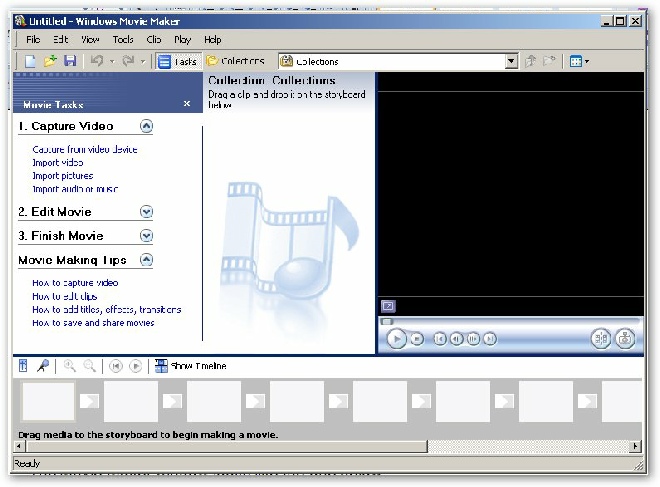
There are four main areas to the Move Maker Window;
Movie Tasks-
Collection – the area where you will place the individual items that eill make up your movie.
Monitor -
Storyboard – shows the sequence or ordering of the clips in your project and easily rearrange them.
Making Your Movie
The first step in making a movie is to Import the Video. You will see the following four options in the Capture Video task;
Capture from video device – if you have a device that contains video the program can move the video clips from the device to your PC.
Import video – imports video files saved on your PC
Import images – imports still images from our PC
Import audio – imports audio from files on your PC or CD
For this project we will use import video and images. The process of importing the video and images is not a difficult one. It will be harder to find or create the materials you need to create your videos.
To import a video do the following
To import a video clip click on Import Video
The import File dialog box will open.
Note that ti opens in the My Video folder.
Select the video clip you want to import and click the Import button.
Note: On some PC’s you can have only one video clip imported at a time.
If that is the case, before you import another video clip you will have to place the present one into the storyboard.
Importing Pictures
To import pictures do the following:
For pictures click on the Import Pictures link.
The import File dialog box will open.
Note that ti opens in the My Pictures folder
Select the picture you want to import and click the Import button
The picture will appear in the Collections area.
Adding Clips to the Story Board
Once you have selected your video clips and your images you add them to the storyboard in the sequence you want them to appear. To add a video clip or image you select and drag it to the next open large white block in the story board. Once you have your video and image clips in the story board you need to add transitions between them.
Adding Transitions to You Movie
In Edit Video click on View Video Transitions, the middle pane will change and show you the video transitions. You can scroll down the list to see all of the available transitions. To see how the transition looks before you select it, click on the transition and in the monitor click on the play button.
When you find one you like add it to you move. To do this select the transition and drag it to the small box between the two clips you want the transition to go between. Once you have done this you can see what the transition looks like by playing the movie in the monitor.
To create various titles click on Make Titles and Credits. The following list will appear
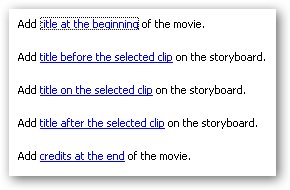
As you can see from the list there are various ways that you can add titles to the movie. When you click on any of the first four selections the following screen appears.
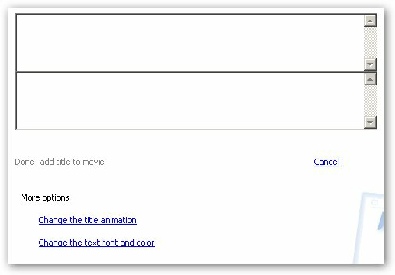
In the first box you can add a Major title, in the second box you can add a sub-
Once you have typed the title (there is no spell checker) you can change the animation of the title by clicking on Change the title animation. A list of the available animations appears. To see how an animation would look click on it the animation will appear in the blue pane.
To change the how the text for the title looks click on Change the text font and color link. The following appears;
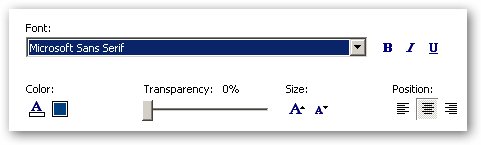
You have the ability to make all of the above changes to the title you have created.
These are the basic steps in creating your movie. There is more that this program can do. You can add audio to your move and you can add effects to you video clips.
Once you have completed your move you need to save your move as a project and as a playable file.
To save your movie as a project click on the file menu and select Save project as. A dialog bow will open asking where you want to save the project. You can either leave it in the My Video folder of select another location. Give you project a name and click on save.
This process saves your video in a format that can be edited again in the Movie Maker application
You also need to save it so that it can be played in applications like Widows Media player, to do the open Finish Movie, the following list will appear.
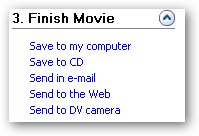
As you can see you have a number of options for saving you move so that it can be played. In this class we will use the Save to my computer option.
When you click on that option the following will appear.

In this box you give you movie a title and select the folder to save it to, note the My videos is the default. Click on Next the following will appear.
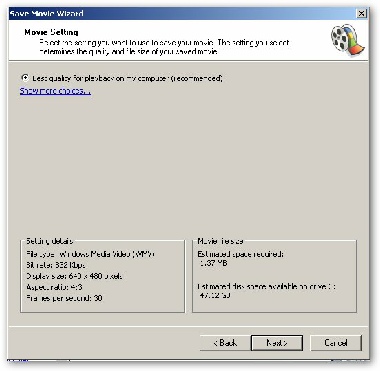
In this box you will see one option for saving your move and at the bottom information about the file that will be saved.
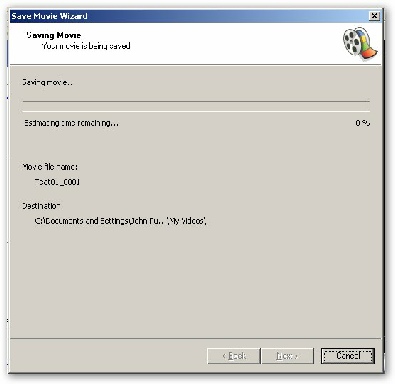
Click Next the above dialog box will appear showing you the progress of the saving process. This process can take several minutes depending on the size of your movie and the quality of your computer. When this process completed a screen will appear asking you if you want to play the movie. At the bottom of the box is the Finish button. Click on that button and the process of saving your movie is complete. If you left the Play movie when I click Finish selected your movie will play.
Once you have completed your movie you will upload it to me through the drop box on D2L. Make sure that you send me the that has the wmn extension, it should be the one with the picture fo the first frame of your move with it
Date modified 12-
| CIS 112 Home Page |
| CIS 114 Home Page |
| CIS 147 Home Page |
| CIS 221 Home Page |
| CIS 112 Class Calendar |
| Using the D2L Dropbox System |
| Educational Goals and Objectives |
| Projects |
| Using the D2L System |
| Project 3 Excel |
| Project 4 Working with Images |
| Project 5 Creating a Slide Presentation |
| Project 6 Creating a Publication |
| Project 8 Making a Movie |
| Adding Information to a Cell |
| Using Formulas |
| Formattin the Spreadsheet |
| Project 3 Excel Spreadshett |
| Starting PowerPoint |
| Adding New Slides |
| Adding Content to a Slide |
| Slide Transitions |
| Animating Slide Content |
| Introduction to Publisher |
| Working with Word Art |
| Creating Text Boxes |
| Inserting Images |
| WindowsMovieMaker |
| CIS 114 Calendar |
| Basic Pacasa Manual |
| Class Projects |
| Working with Folders |
| Renaming a File |
| Copying and Moving Picture Files |
| Organizing Pictures |
| Cropping PIctures |
| Lesson 1 Introduction to Web Plus X5 |
| Lesson 2 Working with Text |
| Lesson 3 Images |
| Lesson 4 Hyperlinks |
| Lesson 5 Final Project |
| Saving and Opening Documents |
| Using the D2L Dropbox System |
| Introduction to WebPlus X6 |
| Setting Up For Publishing |
| Publishing Your Web Site |
| Creating a New Web Site |
| Working With Text |
| Project 2 Text |
| Sample Text Page |
| Saving Image from a Web Page |
| Saving Images from a Image Search |
| Project 3 Images |
| Image Sample Page |
| Project 4 Navigation |
| Hyperlink Example Home Page |
| External Web Pages |
| Personal Photos |
| Contacting Me |
| Adding a Navigation Bar |
| Adding Pages to a Nav Bar |
| CIS 221 Day Calendar |
| CIS 221 Night Calendar |
| Accessing the D2L System |
| Using the D2L Dropbox System |
| Using the Snipping Tool |
| WindowsMovieMaker |