
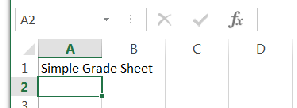
To add text to a cell you click on the cell and begin to type. In the A1 cell type SampleGrade Sheet.
As you type the text it appears in the box next to the three symbols a X, a check mark and the symbol for adding a formula.
Once you have completed adding the text you can go to another cell to continue work on your spread sheet. This can be done by clicking on the check mark. by hitting one of the four arrow keys on the keyboard or by hitting the tab key. The example below shows what happened when I hit the down arrow key.
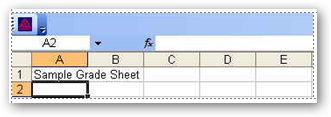
Notice that the words you typed are now in the first cell. Also notice that they look like they extend into the second cell, this is not the case. Notice also that cell A2 has the black box around it indicating this is the cell I am working in. In this cell type Fall Semester 2014. The spread sheet will look like this.
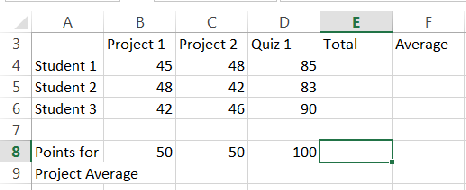
The next thing to do is create the column and row heading. In this case the column headings will be
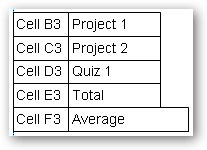
The row headings will be
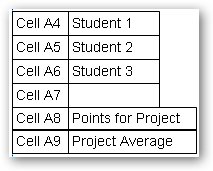
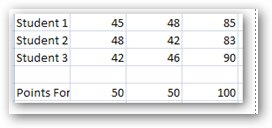
Once you have completed the row and column titles enter the following data.
Working with Formulas
Date modified 09-

Your spreadsheet should now look like the one below.
| CIS 112 Home Page |
| CIS 114 Home Page |
| CIS 147 Home Page |
| CIs 215 Home Page |
| CIS 221 Home Page |
| CIS 230 Home Page |
| CIS 112 Class Calendar |
| Using the D2L Dropbox System |
| Educational Goals and Objectives |
| Projects |
| Using the D2L System |
| Project 3 Excel |
| Project 4 Working with Images |
| Project 5 Creating a Slide Presentation |
| Project 6 Creating a Publication |
| Project 8 Making a Movie |
| Adding Information to a Cell |
| Using Formulas |
| Formattin the Spreadsheet |
| Project 3 Excel Spreadshett |
| Starting PowerPoint |
| Adding New Slides |
| Adding Content to a Slide |
| Slide Transitions |
| Animating Slide Content |
| Introduction to Publisher |
| Working with Word Art |
| Creating Text Boxes |
| Inserting Images |
| WindowsMovieMaker |
| CIS 114 Calendar |
| Basic Pacasa Manual |
| Class Projects |
| Working with Folders |
| Renaming a File |
| Copying and Moving Picture Files |
| Organizing Pictures |
| Cropping PIctures |
| Lesson 1 Introduction to Web Plus X6 |
| Lesson 2 Working with Text |
| Lesson 3 Images |
| Lesson 4 Hyperlinks |
| Lesson 5 Final Project |
| Saving and Opening Documents |
| Using the D2L Dropbox System |
| Introduction to WebPlus X6 |
| Setting Up For Publishing |
| Publishing Your Web Site |
| Creating a New Web Site |
| Working With Text |
| Project 2 Text |
| Sample Text Page |
| Saving Image from a Web Page |
| Saving Images from a Image Search |
| Project 3 Images |
| Image Sample Page |
| Project 4 Navigation |
| Hyperlink Example Home Page |
| External Web Pages |
| Personal Photos |
| Contacting Me |
| Lesson 1 Digital Data |
| Lesson 2 Text |
| Lesson 3 Graphics |
| Lesson 4 Sound |
| Lesson 5 Video |
| Sample Text Page |
| CIS 221 Day Calendar |
| Accessing the D2L System |
| Using the D2L Dropbox System |
| Using the Snipping Tool |
| CIS 230 Day Class Calendar |
| Adding Information to a Cell |
| Using Formulas |
| Formattin the Spreadsheet |
| Project 3 Excel Spreadshett |