Once you have taken all of your pictures and stored them on your computer, you need a way to find the individual picture you are looking for among the thousands or more of pictures you have stored. Picasa has a number of ways to help you do that.
The first thing you need to do is create folders with names that are general enough to allow you to place many pictures in them. An example would be a folder with the name Cars. In this folder you would put any pictures of cars that you have taken. To find individual pictures of cars you can change the picture's file name, add a caption to the file and add tags to the picture.
Renaming a Pictures File Name
When a digital camera stores a picture on to the card in the camera it creates a generic file name, usually IMG_0366.jpg or something similar. To help organize your pictures it is a good idea to change the name to something that more accurately represents the picture. To do this:
Select the image you want to rename
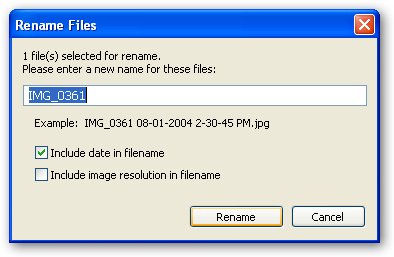
From the File menu select Rename of press the F2 key. The following dialog box will appear.

Change the file name to something more meaningful.
Select Include date in the file name. This allows you to create pictures with the came file name, but because the date is different the file name is unique
When you have finished click on Rename.
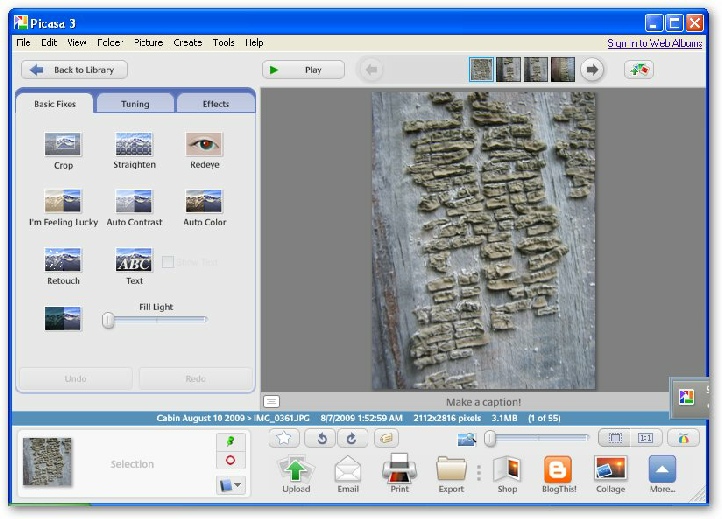
When you finish the file will be renamed. In the blue bar just below the light box you will see the new name.
Photo Captions
Picasa creates captions the way journalists do -
To create a caption for a photo, double click on the desired photo the following window will open.

If you do not see the words “Make a caption at the bottom center of the picture click on the Show/Hide Caption Button
Click over the words Make a caption and type your caption.
Captions can provide detailed information about the individual picture. It is like writing on the back of a photograph and giving the details about who is in the picture or exactly where the picture was taken.
Tags
Tags are like keywords. By applying single or multiple-
To create and add it to a photo, please follow these steps:
Select the photos that you'd like to tag. You can only tag photos in one folder or album at a time.
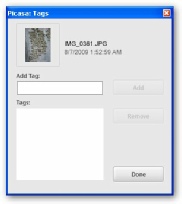
Click View > Tags. You can also use the keyboard shortcut Ctrl-

In the 'Add Tag' text box, enter the tag you'd like to apply to the selected photos.

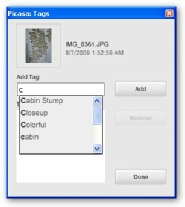
As you type the new tag any tags already existing will appear in a dropdown box below the tag you are typing. If any of the tags is the dropdown box match what your tags is going to be you can just select it.
When you select the tag it will appear in the tab box. Click on the add button and it will be added to the list of tags that describe that photo.
You can add as many tags as you like to each picture.
When you have all the tags you want for the picture click on the done button and the tags will be applied to that picture.
To see any tags applied to a picture, select the picture and go to the view menu and select select tags or use the Ctrl+ t key combination.
Finding Pictures
Once you have renamed the files, created captions and created tags it is a simple matter to find pictures. Just go to the top of the Picasa main page and in the Search box type in the words for what you are looking for. As you do this a list will appear showing you all the possibilities for matches. As you type more letters the list will narrow. If you type in something that does not exist as a file name, caption or tag now list will appear. Just click on the specific work or combination of words and the picture will appear.

Date modified 12-
| CIS 112 Home Page |
| CIS 114 Home Page |
| CIS 147 Home Page |
| CIS 221 Home Page |
| CIS 112 Class Calendar |
| Using the D2L Dropbox System |
| Educational Goals and Objectives |
| Projects |
| Using the D2L System |
| Project 3 Excel |
| Project 4 Working with Images |
| Project 5 Creating a Slide Presentation |
| Project 6 Creating a Publication |
| Project 8 Making a Movie |
| Adding Information to a Cell |
| Using Formulas |
| Formattin the Spreadsheet |
| Project 3 Excel Spreadshett |
| Starting PowerPoint |
| Adding New Slides |
| Adding Content to a Slide |
| Slide Transitions |
| Animating Slide Content |
| Introduction to Publisher |
| Working with Word Art |
| Creating Text Boxes |
| Inserting Images |
| WindowsMovieMaker |
| CIS 114 Calendar |
| Basic Pacasa Manual |
| Class Projects |
| Working with Folders |
| Renaming a File |
| Copying and Moving Picture Files |
| Organizing Pictures |
| Cropping PIctures |
| Lesson 1 Introduction to Web Plus X5 |
| Lesson 2 Working with Text |
| Lesson 3 Images |
| Lesson 4 Hyperlinks |
| Lesson 5 Final Project |
| Saving and Opening Documents |
| Using the D2L Dropbox System |
| Introduction to WebPlus X6 |
| Setting Up For Publishing |
| Publishing Your Web Site |
| Creating a New Web Site |
| Working With Text |
| Project 2 Text |
| Sample Text Page |
| Saving Image from a Web Page |
| Saving Images from a Image Search |
| Project 3 Images |
| Image Sample Page |
| Project 4 Navigation |
| Hyperlink Example Home Page |
| External Web Pages |
| Personal Photos |
| Contacting Me |
| CIS 221 Day Calendar |
| CIS 221 Night Calendar |
| Accessing the D2L System |
| Using the D2L Dropbox System |
| Using the Snipping Tool |
| Working with Folders |
| Renaming a File |
| Copying and Moving Picture Files |
| Organizing Pictures |
| Cropping PIctures |