Objectives of the Week
As was the case last week, much of tonight should considered a review of prerequisite material. This will include basic decision logic and will go over how to use the Boolean controls in checking user selections. This class will also present some basic edit checks so you van validate some of the user input, and introduce you to the VB Debugger and the debugging environment.
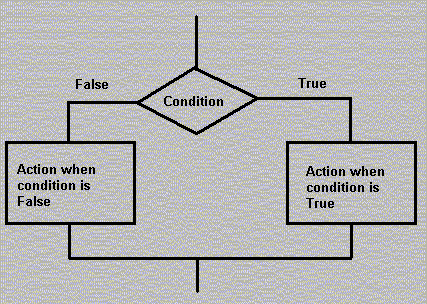
Decision making in computer programming is always reduced down to a Yes or a No condition. To enable this decision making process into a program is to carry out one set of instructions when a condition is true and a different set of instructions when the condition is false. In flowchart form, this decision making process can be diagrammed as follows:

As you can see by the diagram, there is no "sort of" or "maybe" path. A condition is evaluated as either True or False and a distinct path through a distinct action is taken.
In Visual Basic, the structure described in the diagram is implemented using this syntax:
| If intCount > 10 Then lblMessage.Caption = "Time to quit" Else lblMessage.Caption = "Want to try again?" End If |
When the Integer defined as intCount contains a number that is larger than 10, modify the caption of the label control names lblMessage to say "Time to quit", Otherwise, (when intCount is less than or equal to 10) modify the caption of the label control names lblMessage to say "Want to try again?" |
This describes the basic structure and syntax of the decision structure, but the examples of the evaluated conditions and the actions can become quite complex.
String Comparisons
Performing String Comparisons is often difficult because of the possible combinations with respect to Case.
Are these strings equal? "Bob", "BOB", "bob", and "BoB"
To a person, these four strings all are generally considered to be the same, but VB does not agree. To level the field, VB supplies a number of string conversion functions.
If UCase(txtName.Text) = "BOB" Then
In this example, all four of the strings would match. This is accomplished by translating the TextBox input to upper case and the comparing it to a literal that is coded in Upper Case. UCase only makes the conversion for use with the If statement and the content of the Text Box is left unchanged.
Strings are compared in terms of sequence, or Greater Than - Less Than using the ASCII Sequence. See Table 4.2 on page 129 in your text or locate a copy of an ASCII Chart that is included in many text books.
In ASCII, Upper Case letters are evaluated less than Lower Case letters. This means that "VB" is less than "vb" .
Comparison Operators
| > | Greater Than | If Val(txtTemperature.Text) > intFreezing Then |
| < | Less Than | If Val(txtTemperature.Text) < intBoiling Then |
| = | Equal | If Val(txtTemperature.Text) = intFreezing Then |
| <> | No Equal | If Val(txtTemperature.Text) <> intBoiling Then |
| >= | Greater Than or Equal | If Val(txtTemperature.Text) >= intFreezing Then |
| <= | Less Than or Equal | If Val(txtTemperature.Text) <= intBoiling Then |
Using Compound Conditions
| And | Both conditions must be True | If Val(txtChoice.Text) = 1 And
UCase(strLang) = "VB" Then Both conditions must be True for the entire
condition to be True |
| Or | Only one condition must be True | If Val(txtChoice.Text) = 1 Or UCase(strLang)
= "VB" Then Only one of the two conditions need to be True for the entire
condition to be True |
| Not | Reverses the condition | If Not Val(txtChoice.Text) = 1 Then Choice can be anything except 1 for the condition to be True |
Another Example
| If intCount > 10 And intHour >= 9
Then lblMessage.Caption = "Too late. Time to quit" Else lblMessage.Caption = "Go ahead. Try again" End If |
If the program has run more that 10 times and it is 9:00 or
later, then don't run again. Otherwise, play as long as you'd like. Both conditions must be true to stop the program. |
Using the Boolean Controls
Option Buttons and Check Boxes are Boolean controls and are well suited for use with conditional statements.
| If optFreshman.Value = True Then intFreshmanCount = intFreshmanCount + 1 End If |
If chkBold.Value = vbChecked Then txtText.Bold = True End If |
VB contains reserved words True and False and Intrinsic Constants vbChecked and vbUnchecked
A Few More If Then - Else Example
If - ElseIf - ElseIf - Else
This code is part of a Command Button Click Event, so clicking on the opttion button only changes the Option Button Value. It is not until the Command Button is Clicked that you see the result of the Option Button choice.
Private Sub cmdGo_Click()
If optRed.Value Then
frmMain.BackColor = vbRed
ElseIf optGreen.Value Then
frmMain.BackColor = vbGreen
ElseIf optBlue.Value Then
frmMain.BackColor = vbBlue
Else
' This is really a catch all and
' should never happen with a set
' of option buttons
frmMain.BackColor = vbWhite
End If
End Sub
One problem with this setup is that even though the Red Option Button is set to True at design time, the form background is not set until the user clicks on the Command Button. Why not just call the Command Button Click event from Form_Load. Remember, Form_Load a good spot for initialization code.
Private Sub Form_Load()
cmdGo_Click
' Call an Event Procedure
End Sub
A More Complex Example
| If optMale and intAge > 21 Then intMaleOver21 = intMaleOver21 + 1 ElseIf optMale and intAge <= 21 Then intMaleUnder21 = intMaleUnder21 + 1 ElseIf optFemale and intAge > 21 Then intFemaleOver21 = intFemaleOver21 + 1 ElseIf optFemale and intAge <= 21 Then intFemaleUnder21 = intFemaleUnder21 + 1 Else intUnknown = intUnknown + 1 End If |
If optMale Then
' Males If intAge > 21 Then intMaleOver21 = intMaleOver21 + 1 ElseIf intAge <= 21 Then intMaleUnder21 = intMaleUnder21 + 1 Else intUnknown = intUnknown + 1 End If ElseIf optFemale Then 'Females If intAge > 21 Then intFemaleOver21 = intFemaleOver21 + 1 ElseIf intAge <= 21 Then intFemaleUnder21 = intFemaleUnder21 + 1 Else intUnknown = intUnknown + 1 End If Else intUnknown = intUnknown + 1 End If |
In general, it is much better to split out conditions into a series of Nested If statements than it is to code Multiple Condition using And, Or, or Not. The code on the left may appear to be more compact, but the code on the right is prefered because it is generally easier to read and understand, and because of this, it will be easier to maintain.
The Message Box
The use of a Message Box is a quick and easy way to display a message to the user. In general, most people find them annoying as they interrupt your process and force you to select a response. There are much, much better ways to communicate with the user, so use them sparingly after this chapter.
The syntax is:
MsgBox "The Message", Button / Icon Selection, "Message Box Caption"
Button / Icon selection is done using Intrinsic Constants and these values are available to you in the code window through the AutoFill feature. Combine the Buttons and Icons using the "+" Operator. Here are some of your choices
| vbOKOnly | Display OK button only. |
| vbOKCancel | Display OK and Cancel buttons. |
| vbAbortRetryIgnore | Display Abort, Retry, and Ignore buttons. |
| vbYesNoCancel | Display Yes, No, and Cancel buttons. |
| vbYesNo | Display Yes and No buttons. |
| vbRetryCancel | Display Retry and Cancel buttons. |
| vbCritical | Display Critical Message icon. |
| vbQuestion | Display Warning Query icon. |
| vbExclamation | Display Warning Message icon. |
| vbInformation | Display Information Message icon. |
| vbMsgBoxRight | Text is right-aligned. |
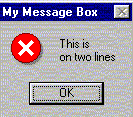
Multiple Line Message Boxes can be coded using the Intrinsic Constant vbCRLF so coding:
MsgBox "This is" & vbCrLf & "on two lines", vbOKOnly + vbCritical, "My Message Box"
results in:

In later chapters, we will discuss the Message Box as a function
Input Validation
The are a number of methods used for validating the user input.
| Numeric | IsNumeric function | If Not IsNumeric(Val(txtNumber.Text)) Then |
| Range | Greater Than or Less than | If Val(txtNumber.Text) > intLargestValue Then |
| Required | Check for Null String | If txtName.Text = "" Then |
The IsNumeric function returns a Boolean Value indication whether of not the argument passed contains numeric data. This function is not "bullet proof", but it will certainly help you weed out bad data entered by the user.
Use the Message Box to report invalid input back to the user.
Structure of an Event Handler using Input Validation
A good way to structure an event handler that validates the input is to divide the logic into two sections. The first section will perform the edits on any input variables, issuing error messages and exiting the event handler when invalid input is detected. If all the input is "clean", then continue with the second section which will carry out the function of the event handler, i.e. accumulate totals and update the user interface.
Exit Sub is the Visual Basic instruction that will immediately take you out of the Event Handler. The "Null If", also makes the code a bit more readable by eliminating "negative logic".
' First Section of Event Handler
Check each control for valid input
If Errors Detected
Message Box with Error Message
SetFocus to control containing invalid input
Exit Sub
End If
' If you get here without leaving, all of the input is valid
Rest of Event Handler Logic
Here is a coding example:
' Edit the name
If txtName.Text = "" Then
MsgBox "You must enter a name", vbCritical + vbOKOnly,
"Error in the name"
txtName.SetFocus
Exit Sub
End If
' Edit the age
If IsNumeric(txtAge.Text) Then
' The "Null If" says if the input is valid, just continue
Else
MsgBox "You must enter an age", vbCritical + vbOKOnly,
"Error in the age"
txtAge.SetFocus
Exit Sub
End If
' All the input passes the exit criteria
Sectioning the Event Handler into these two distinct sections makes for much simpler programming as you get to a point where you can continue the function of the event handler knowing that the input you have to work with is valid.
Debugging
The VB development environment contains a source level debugger that allows you to control the execution of your program by setting breakpoints in the code and examining or changing the value of your programs variables.
Stepping Through the Code
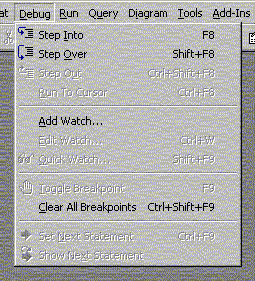
 |
To begin the Debug Session, select Debug | Step Into or press
F8. The debugger will open and stop on the first instruction to be executed. This might
not be immediate as it is only your event handler code that will be run. You may not see the debugger session until you click on one of your command buttons. When you get to the debug environment, you have a number of options available to you. |

Breakpoints
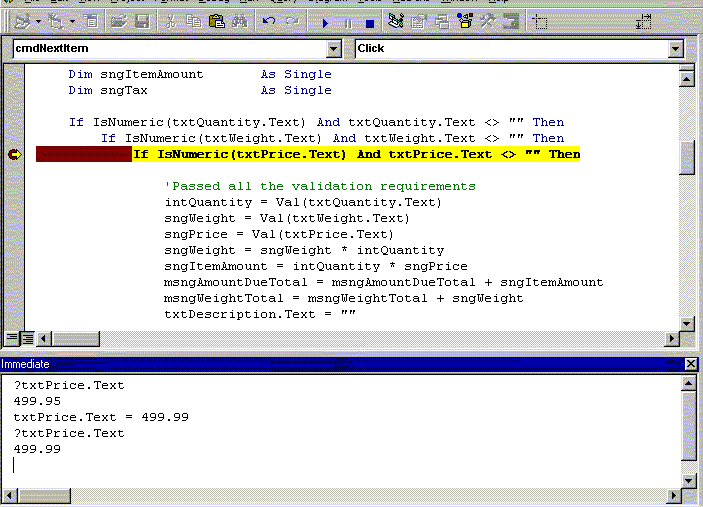
A breakpoint is a program location where the execution unconditionally halts. This gives you an opportunity to examine the state of your application. You have a chance to look at the contents of program variables and single step through the code using the F8 key. You can continue execution up to the next breakpoint by pressing F5. You can set a breakpoint by clicking in the left margin of the Debug Code Window. You will see a breakpoint indicated by the dot in the margin. Click on the dot to remove the breakpoint.
Examining the Value of program variables
To see the value of a variable, simply position the mouse cursor over a reference to the variable in the Debug Window. The value will be displayed in Tool Tip Text format. Very easy access to the content of from controls or program variables
Immediate Window
Use the Immediate Window and the BASIC print instruction (either Print or ?) to display the contents of a variable. You can also change the value of a variable in the Immediate Window by simply coding an assignment statement. The example above shows the display of the original value, the assignment statement changing the value, and a second display showing the changed value. If you cannot find the Immediate Window, select View | Immediate Window from the VB Menu or press Ctrl-G.
Debugging Step by Step - Page 155 thru 161
Walk through this example using the debugging tutorial in the text book.
Build the Example
Step by Step through the First Example
Make sure that you:
Lab 1 -From the text - Page 165, VB Mail Order
Step by Step through the First Lab
Let me know when you are done and I will check you off as Complete
Lab 2 - From the Text - Page 166, VB Auto Center
You are on your own.
Reading Assignment
Programming Assignment
As Always: The assignment is due before the start of class next week
Project Name
Page 164, Problem 4.3 and 4.4 and for Extra Credit Problem 4.5
As with many of the programs so far, the majority of the work is in designing the user interface including the keyboard shortcuts. The majority of the coding is tied to the Calculate button. This event handler will evaluate the controls set on the form and maintain the totals necessary to maintain the account information. The Extra Credit simply formats and displays the accumulated totals on a Message Box.