Part one is a review from last week on how to complete the first step of every project
Part 1 - Housekeeping / Overhead
Start Visual Basic
From the New Project Dialog, select Standard EXE and click on Open
This is the default selectionYou are now looking at the VB Environment
Note the Toolbox, Property Windows, and the Form WindowIn the Properties Window for the Form, change two properties:
Name: frmMain Caption: Your Last Name - Example 2 You will see that the Title Bar of the Form now has a new Caption
In the Properties Window for the Project, change the Name property to Your Last Name with E02 appended
You will perform these steps with EVERY new project.
The code windows is where you will write your Event Handlers
Begin with a Comment Block as follows
'
' Name
' Class and Meeting Time
' Brief Description of this Program
'
Option Explicit
This will be part of every example and program for this class
Part 2 - Building the Example Application
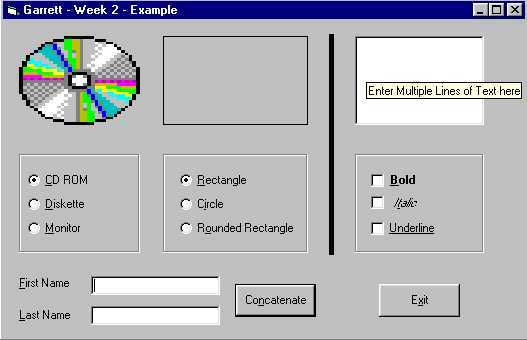
Build the User Interface
Add the controls as described:
| Image Box | imgPicture | Picture Property set to CD ROM Graphic Stretch Property set to True The graphics are located under the Visual Studio folder
under |
| Shape | shaShape | Shape Property set to Rectangle |
| Line | (default) | Border Width Property set to 5 |
| TextBox | txtText | MultiLine Property set to True Text Property set to Null |
| Frame | (default) | Caption Property set to Null |
| Option Button | optCD | Caption Property set to &CD |
| Option Button | optDisk | Caption Property set to &Diskette |
| Option Button | optMonitor | Caption Property set to &Monitor |
| Frame | (default) | Caption Property set to Null |
| Option Button | optRectangle | Caption Property set to &Rectangle |
| Option Button | optCircle | Caption Property set to C&ircle |
| Option Button | optRoundeRectangle | Caption Property set to R&ounded Rectangle |
| Frame | (default) | Caption Property set to Null |
| Check Box | chkBold | Caption Property set to &Bold Select Bold from the Font Dialog |
| Check Box | chkItalic | Caption Property set to I&talic Select Italic from the Font Dialog |
| Check Box | chkUnderline | Caption Property set to &Underline Select Underline from the Font Dialog |
| Label | (default) | Caption Property set to &First Name |
| TextBox | txtFirstName | Text Property set to Null |
| Label | (default) | Caption Property set to &Last Name |
| TextBox | txtLastName | Text Property set to Null |
| CommandButton | cmdConcatenate | Caption Property set to Co&ncatenate Default Property set to True |
| CommandButton | cmdExit | Caption Property set to E&xit Cancel Property set to True |
Use the Format Menu Option to correctly size and align the controls on the form.
Set the Tab Indexes for all the controls starting with First Name, then Last Name, and then cycle through the controls contained in the three frames and on to the two command buttons and finally to the text box.
Run the program: Click on Run | Start With Full Compile
Test the Tab Sequence and the Keyboard Interface
You have completed the user interface (almost).
Build the Event Handlers
Command Button Click Events
Private Sub cmdConcatenate_Click()
txtText.Text = txtLastName.Text & ", " & txtFirstName.Text
End Sub
Private Sub cmdExit_Click()
End
End Sub
The buttons perform the concatenation and exit the program.
Test the program by first entering your First and Last name in the text boxes
Enter and Escape, testing the Default and Cancel Properties
Alt-N and Alt-X should trigger the Concatenation and Exit Command Buttons
There are also NINE click events to code for the Option Buttons and the Check Boxes
Start with the Check Boxes
Private Sub chkBold_Click()
txtText.Font.Bold = chkBold.Value
End Sub
Private Sub chkItalic_Click()
txtText.Font.Italic = chkItalic.Value
End Sub
Private Sub chkUnderline_Click()
txtText.Font.Underline = chkUnderline.Value
End Sub
The Check Boxes are Boolean. (Remember it's either checked or it's not checked)
The Font Properties are Boolean (It's either Italic or it's not Italic)
Setting the Font Properties to the Value of the Check Boxes worked very well
Test this phase of the program. Make sure you verify the tab sets and the keyboard interface.
The Shape Control uses the Intrinsic Constants to set the Shape Property. Easier to understand than if the meaningless number literals were used.
Private Sub optRectangle_Click()
shaShape.Shape = vbShapeRectangle
End Sub
Private Sub optCircle_Click()
shaShape.Shape = vbShapeCircle
End Sub
Private Sub optRoundRect_Click()
shaShape.Shape = vbShapeRoundedRectangle
End Sub
Test this phase of the program.
Now for the Graphics:
Private Sub optCD_Click()
imgPicture.Picture = imgCD.Picture
End Sub
Private Sub optDisk_Click()
imgPicture.Picture = imgDisk.Picture
End Sub
Private Sub optMonitor_Click()
imgPicture.Picture = imgMonitor.Picture
End Sub
Only one Image Box but a selection of Three Pictures? Where are imgCD, imgDisk, and
imgMonitor?
Take a look at the bottom of the form.
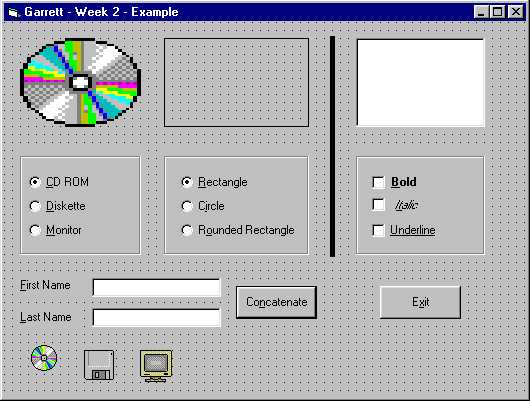
"Hidden" at the bottom are three images boxes that have their Picture Properties set to the graphics that are to be displayed. This is a type of pre-loading of the pictures at design time. At run time, simply "copy" the Picture Property of the selected image to imgPicture that is displayed on the form.
The three pre-loaded images have their Visible Property set to False, so that if someone resizes the form, the three images will not show up on the form.
Add the three hidden images and initialize their Visible and Picture Properties.
The graphics are located under the Visual Studio folder under Common \ Graphics \ Icons \
Computer
Finish up the testing and be sure to save the project.
A couple of thoughts before this example is complete.
Always complete the User Interface first testing the tabs and keyboard interface.
Make sure the interface looks and works as it should before moving on to the coding.
Code and Test each Event Handler or group of Event Handlers individually
Make sure that they work before moving on to the next set.
When the application is complete, the testing continues, but build the program a step at a time and verify that each step works as it should before moving on to the next. It is foolish to sit down and write the entire application, and then attempt to test the entire program as a whole.
The opportunity to test the Event Handlers individually is an important feature of Event Driven Programming.