Example 2 for Week 8 - Step by Step
This program will demonstrate the use of Control Arrays and the use of the TAG property.
The application consists of three forms. The main form will hold the array of TextBoxes
that were created using the information added on the Add screen. TextBox format
information is stored in each Control Array TAG property. In this case, the format
information describes the Type (Numeric or Alpha) and the Length (number of characters
that can be entered). Because each controls can have a unique format base on the TAG
property, the editing criteria that is programmed by the user introduces additional
keystroke processing events. The Display form will display the format information from the
selected TextBox.
Part 1 - Housekeeping / Overhead
- Set the Project Name to Your Last Name | E082
- Set the Form Name and Form Caption
Save the Project in your NEW Project directory
Add the Second Form
Add the Third Form
Click on the Save Icon in the Tool Bar.
Part 2 - Building the Example Application
 |
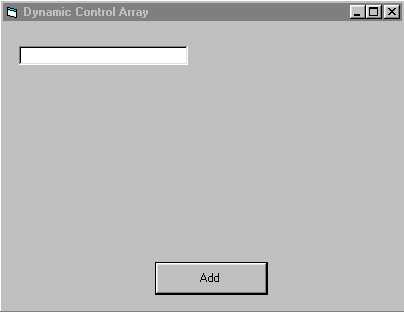
The Main form, which appears empty at startup contains a single TextBox
that has the Index Property set to 0. This is what makes the control a Control Array. This
form does nothing except call the two other forms for their respective services. It does
perform edits on the array of text boxes using the format information contained in the tag
property. This code is detailed below. |
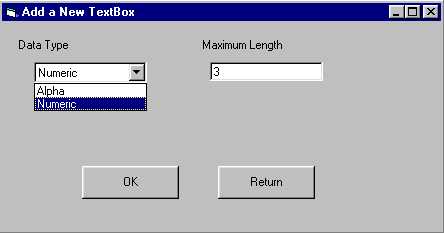
| The Add Form will edit the input controls and then place a textbox onto the main form.
The TAG properties will contain an encoded string that describes the
"properties" of the text box. Note the logic required to properly place the
control on the main form. The main form contains two public variables used to maintain the
position of "the next open array slot" This code is detailed below. |
 |
 |
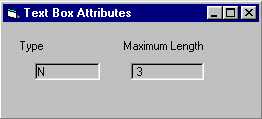
This form only summarizes the content of the associated TextBoxes TAG
property. The contents are decoded and placed in the labels on this form. Private
Sub Form Load()
Dim xIdx As Integer
xIdx = frmMain.sidx
lblType = Left(frmMain.txtArray(xIdx).Tag, 1)
lblLength = Right(frmMain.txtArray(xIdx).Tag,
Len(frmMain.txtArray(xIdx).Tag)
- 1)
End Sub |
The Add form is where the work takes place. When the user click the OK button, the
program:
- Increment the Index and Load the new control (First Pass is indicated when the Index is
-1)
- Position the Control on the Form.
- Load the Format information into the TAG Property
- Some cleanup or initialization work at the end
Private Sub cmdOK Click()
Dim idx As Integer
If frmMain.idx = -1 Then
frmMain.idx = 0
Else
frmMain.idx = frmMain.idx + 1
Load frmMain.txtArray(frmMain.idx)
End If
idx = frmMain.idx
If idx = 10 Then
frmMain.txtArray(idx).Top = frmMain.txtArray(0).Top
frmMain.txtArray(idx).Left = _
frmMain.txtArray(0).Left
+ frmMain.txtArray(0).Width + 100
ElseIf idx > 0 Then
frmMain.txtArray(idx).Top = _
frmMain.txtArray(idx -
1).Top + frmMain.txtArray(idx - 1).Height + 10
frmMain.txtArray(idx).Left = frmMain.txtArray(idx -
1).Left
End If
frmMain.txtArray(idx).Tag = Left(cboType.Text, 1) &
Str(txtLength)
frmMain.txtArray(idx).Visible = True
frmMain.txtArray(idx).Text = ""
If frmMain.idx = 19 Then
cboType.Enabled = False
txtLength.Enabled = False
cmdOK.Enabled = False
End If
End Sub
On the Main Form, use the contents of the TAG Property to restrict what is entered.
This is not bullet-proof, but it will work for most situations.
Whenever a key on any of the TextBoxes in the Control Array, the KeyPress event is
fired and the index of the control and the key that was pressed is passed to the form. The
KeyStroke is passed as an Ascii integer.
For more information go to Google.COM
and search on "ASCII chart"
Here is the event handler and function used to restrict the keystrokes:
Private Sub txtArray KeyPress(Index As Integer, KeyAscii As
Integer)
Validate txtArray(Index), KeyAscii
End Sub
Private Sub Validate(TB As TextBox, key As Integer)
Dim maxlength As String
Dim cKey As String * 1
If key < 32 Or key > 126 Then
Exit Sub
End If
maxlength = Right(TB.Tag, Len(TB.Tag) - 1)
If Len(TB.Text) = Val(maxlength) Then
Beep
key = 0
Exit Sub
End If
Select Case Left$(TB.Tag, 1)
Case "A"
cKey = UCase(Chr(key))
If cKey < "A" Or
cKey > "Z" Then
key = 0
Beep
Exit Sub
End If
Case "N"
If key < Asc("0")
Or key > Asc("9") Then
key = 0
Beep
Exit Sub
End If
End Select
End Sub
Setting the KeyStroke to 0 will "throw out" or ignore the transmitted
keystroke.
There are various event handlers and routines to build the edits and error prevention
functions into the program. This code is detailed below:
Something must be in the Length field before the Control
can be added
Private Sub SetEnabled()
If txtLength = "" Then
cmdOK.Enabled = False
Else
cmdOK.Enabled = True
End If
End Sub
Initialize the ComboBox
Private Sub Form Load()
cboType.AddItem "Alpha"
cboType.AddItem "Numeric"
cboType.ListIndex = 0
SetEnabled
End Sub
Edit on every change. Highlight the Errors
Private Sub txtLength Change()
Dim limit As Integer
If IsNumeric(txtLength) = False Then
txtLength.SelStart = 0
txtLength.SelLength = Len(txtLength)
cmdOK.Enabled = False
Exit Sub
End If
If Left(cboType.Text, 1) = "A" Then
limit = 25
Else
limit = 4
End If
If Val(txtLength) > limit Then
txtLength.SelStart = 0
txtLength.SelLength = Len(txtLength)
cmdOK.Enabled = False
txtLength.SetFocus
Exit Sub
End If
SetEnabled
End Sub
Only the proper characters (Numbers) and the Backspace
key
Private Sub txtLength KeyPress(KeyAscii As Integer)
If KeyAscii = 8 Then
Exit Sub
End If
If KeyAscii < Asc("0") Or KeyAscii >
Asc("9") Then
KeyAscii = 0
End If
End Sub
Call the Change Logic to Edit
Private Sub cboType Click()
txtLength Change
End Sub
Back to Week 8


