Example for Week 7 - Step by Step
Add items and their cost to a list box. Select a shipment method and insurance (if
necessary) and print a summary of the order. This program will use two forms. The first is
used for the item maintenance and order selection. The second will be used to capture a
printed summary of the order.
Part 1 - Housekeeping / Overhead
- Set the Project Name to Your Last Name | E07
- Set the Form Name and Form Caption
Save the Project in your NEW Project directory
Add the Second Form
Click on the Save Icon in the Tool Bar.
Make sure you name the form frmPrint and that it is saved to the project directory
Part 2 - Building the Example Application
Build the User Interface for each form.
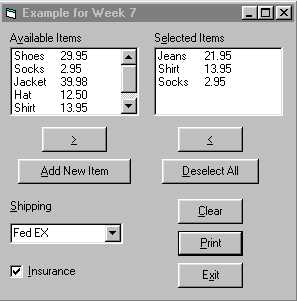
First is the selection form
 |
The available items are build using two InputBox commands. The first for
the item, the second for the cost. Edits are basic and coded below. Each ListBox has
MultiSelect coded. To Order an item, highlight what you want, and then click on the
">" button to copy it over.
To remove the contents of Selected Items, highlight the entries you want to remove and
click the "<" button.
Deselect All must unhighlight all of the Selected Items.
Shipping method is optional. You must be able to pick from the list, or enter a
specific shipper in the control. The list can be loaded at design time or at run time.
The Clear Button will empty the Selected Item box |
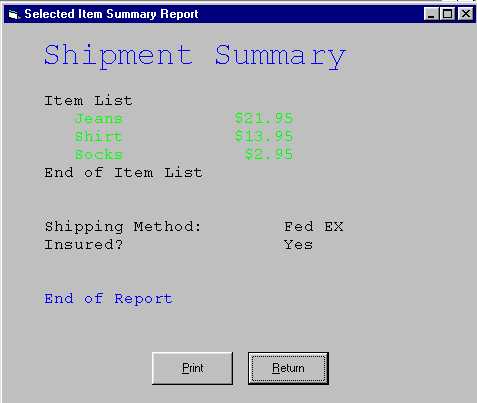
Next is the Order Summary form
 |
All of the information comes from the main form. Shipping
method must be indicated. Either by specifying the shipper or saying "None
Specified" List the items, work with the fonts and colors.
Print will use the PrintForm method for this form and actually route it to the printer,
but that is not necessary for this example.
This form will be empty at design time excedpt for the
buttons. The content will be built at one of the Form events. |
Make sure you have the keyboard interface.
How do you code a keyboard interface for a ListBox?
Done with the user interface?
Make sure you save your work.
Run the program: Click on Run | Start With Full Compile
Build the Event Handlers
Snippits from frmMain
To Add a new Item to the Available Items:
Const strDefault As String = "Type the name here"
Dim strItem As String
Dim strCost As String
Dim intResponse As Integer
strItem = InputBox("Enter a new item", "New Item", strDefault)
If strItem = strDefault Then
intResponse = MsgBox("Accept the default name?", _
vbQuestion + vbYesNo, "Just Double Checking")
If intResponse = vbNo Then
Exit Sub
End If
End If
If strItem = "" Then
Exit Sub
End If
If strItem = Space(Len(strItem)) Then
Exit Sub
End If
strCost = InputBox("Enter the cost of the item", "Item Cost",
FormatCurrency(0, 2))
lstItems.AddItem strItem & vbTab & strCost
A couple of things here:
The edit for the item name checks to see if the user has clicked OK with the Default
value in the Input Box. If they have, then double check using the Message Box function,
exiting if they did this accidently. Other checks for Null might indicate that the Cancel
button was pressed in the Input Box.
There is no real edit for the Cost so format the value as currency. The Name and Cost
fields are Added to the Available Items ListBox. It is
important to note that they are separated by a Tab character.
Check the function of each command button and make sure that if you double
click on the a Selected Item, that it is removed from the ListBox
Here are some snippits from frmPrint. These demonstrate how to address
certain features. You have seen most all of these concepts in prior classes.
Font Control
lngDefaultColor = Me.ForeColor
Me.Cls
Me.Print
Me.Font.Name = "Courier New"
Me.Font.Size = 24
Me.ForeColor = vbBlue
Me.Print Tab(3); "Shipment Summary"
Me.ForeColor = lngDefaultColor
Save the default color. Clear the screen, print a blank line and print a Blue Heading
Handle the Shipping Method and the Insurance. Insurance is Red if not selected
Me.Print
Me.Print Tab(5); "Shipping Method:"; Tab; _
IIf(frmMain.cboShipping.Text = "", "None Selected",
frmMain.cboShipping.Text)
Me.Print Tab(5); "Insured? "; Tab;
If frmMain.chkInsured.Value = vbChecked Then
Me.Print "Yes"
Else
Me.ForeColor = vbRed
Me.Print "None selected"
Me.ForeColor = lngDefaultColor
End If
Set up a loop to display each ordered item. Display a message if nothing was ordered
Me.Font.Size = 12
Me.Print
Me.Print Tab(5); "Item List"
intItemCount = 0
Me.ForeColor = vbGreen
For i = 0 To frmMain.lstSelected.ListCount - 1
strTemp = frmMain.lstSelected.List(i)
p = InStr(strTemp, vbTab)
strItem = Left(strTemp, p - 1)
Me.Print Tab(8); strItem;
strFormatted = FormatCurrency(Val(Mid(strTemp, p + 1)), 2)
Me.Print Tab(30 - Len(strFormatted)); strFormatted
intItemCount = intItemCount + 1
Next i
Me.ForeColor = lngDefaultColor
If intItemCount = 0 Then
Me.ForeColor = vbRed
Me.Print Tab(8); "No Items Selected"
Me.ForeColor = lngDefaultColor
End If
Me.Print Tab(5); "End of Item List"
Me.Print
Maybe these instructions need a bit more discussion:
This instruction takes everything to the right of the Tab character (Mid function),
converts it to a number (Val function) and formats it as Currency. This is the cost
portion of what is in the ListBox. Recall that the description and the cost were separated
by a Tab Character
strFormatted = FormatCurrency(Val(Mid(strTemp, p + 1)), 2)
This instruction right justifies the formatted number. We want all of the decimal points
to line up.
Tab to an absolute poistion (30), then back off based on the size of the formatted string.
Me.Print Tab(30 - Len(strFormatted)); strFormatted
OK. Done? Back to the main page.
Back to Week 7

