Objectives of the Week
Database Terminology
In general, a database is any data store. The flat files discussed last week are in fact databases. In this chapter, the specific topic will be Relational Databases. A relational database is a database on which you can perform relational operations. That's doesn't tell you too much does it. The first step is to understand the components and the relationship between the components that make up the relational database.
The Database
A Relational Database is a collection of tables. Relational Databases can contain other objects, such as queries and stored procedures, but the concentration will be on tables for now. Queries are made up of predefined access to multiple tables in a database, and Stored Procedures are user written applications used to access the database tables. A table is designed to hold related data. For example, you may have a Customer Table and a Product Table, obviously containing data about your Customers and Products. These tables can be stored in the same database, and the relational operations allow access the data in the tables individually, and allow access to related data across both tables using a single command.
Tables
Each table consists of a collection of rows and columns. A table can be conceptualized as a spreadsheet. Each column defines a table field and each row defines a table record. A database can be queried based on a criteria that matches a particular column. For example, all rows where the "Status" column = "Active". A more complex query might look for related information from more than one table. For example, the Customer Name and Product Description where the "Status" is "Active" and the "Product Category" is "Book". This query might provide a list of Customers that have purchased Products that were Books. The relationship between the tables in this example might be the Product Code.
SQL - Structured Query Language
SQL is the language used to perform the relational operations. SQL is very powerful and can be used to make changes to many columns across many tables using simple commands. SQL will be discussed more next week. When SQL is used to query for rows in the database, what is returned to the application is known as a Recordset and depending on the complexity of the SQL query statement, the recordset can consist of data from selected rows of selected columns from many tables. The recordset can be thought of a a table that is structured dynamically by the SQL query.
Building a Database
Visual Basic supports access to a number of database formats, including Access, DBase, FoxPro, and can even interpret some Text Files as a relational database. VB comes packaged with a component that will allow the creation and maintenance of these types of databases. The Visual Data Manager is available as a Visual Basic Add In. While this is a readily accessible tool, and works very well to create tables and provide access to the data, it is a bit more difficult to use than Microsoft Access.
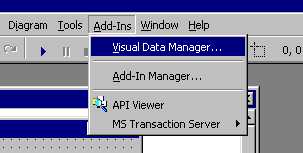
Select Add-Ins and then Visual Data Manager
Select Add-Ins, and Visual Data Manager to start the tool. Use the File option to select an existing database or to create a new database. When creating a new database, select Access Version 7.0, and then proceed with the Table and Column definition. After the table has been built, the Visual Data Manager allows the maintenance of the table rows. This includes adding new rows to the table.
Perhaps an easier way to build and maintain databases and tables is to use Microsoft Access. This product is available on many workstations and if it is present, it's use would be preferred over the Visual Data Manager.
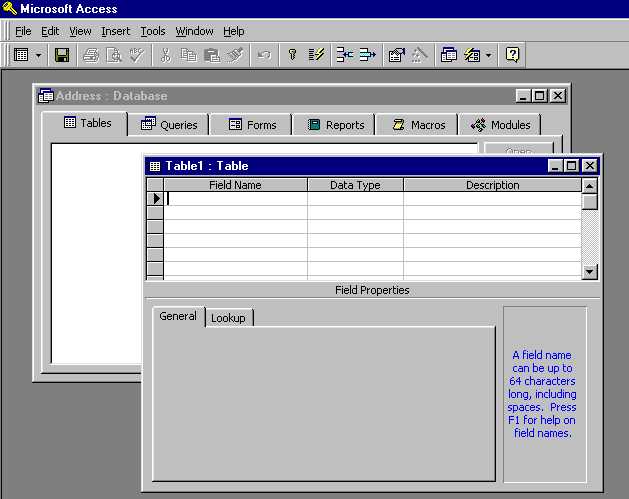
Open Access and select an existing database or create a new database. You can create a new table and define the columns and the column properties (for now, take the default of Text on each column), and then continue to add rows to the new table.
Back to Visual Basic
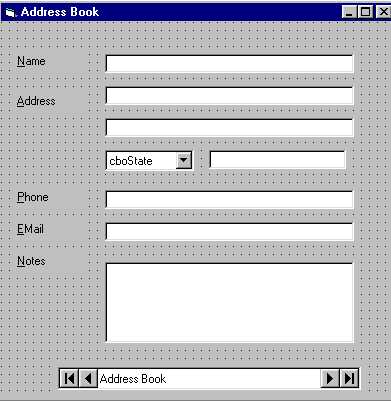
Now that the database has been built, begin to build the application that will maintain the tables. Create a form that will contain a TextBox for each column in the table. Note the use of the ComboBox for the State. The examples for this week will only use the TextBox portion of the control. The user interface will look something like this:
The Data Control
The Data Control in VB provides simple access to the information stored in relational databases. The following properties are set at design time to provide the database access.
| DatabaseName | Contains the physical database name. This gives the Data Control access to the structure of the database including access to the tables and to the columns within each table. This should be specified at design time, but can be modified at run time. |
| RecordSource | The RecordSource will generate the Recordset of the information selected from the Database. The RecordSource will be a table, a query, or an SQL statement. When the Data Control is initialized, the database specified in the database name property is queried using the content of the RecordSource. The result is a Recordset that can be processed by your application. |
Never key directly into either of these properties. Always select from the dialogs the object you want to assign to these properties. Order is important here also. It only makes sense that you must select the Database Name before you can select a RecordSource from the Database.
There are a number of Recordset Types that may be specified in the Data Control
| Snapshot | Static Readonly Copy of the Recordset |
| Dynaset | Recordset consisting of the "key" to each selected record. The full row of data in the database is only retrieved when it is required for edit or display by the application. |
| Table | Recordset consisting of an entire table processed a row at a time. |
Each recordset type basically functions the same, except that the SnapShot is ReadOnly. There are efficiencies depending on how you access and update the table data.
Add the Data Control to the form, give it a name (dtaAddress), and set the properties so they refer to your database and your Address table.
Make sure that the Connect property is set to the proper version of Access
Bind the Text Boxes to the Data Control
Many (most data type) controls in VB are Data Control aware. There are two properties that are set to make a connection between the control and a column in a table. This process in known as a Bind
| Data Source | Select the Data Control |
| Data Field | Select the associated table column |
Order is again important and you should always select and never directly enter values in these properties. You must select the Data Source before you can select the columns from the table that has been associated with the Data Source.
When the bind process is complete, you can run the program and use the Data Control navigation buttons to move between rows in your database.
Programming the Data Control
The Data Control has a number of methods that enable the programming to navigate the contents of the Recordset. Recall that the Recordset is the set of rows returned based on the setting of the Data Controls RecordSource property. Since this property is set to refer to the Address Table, these are the rows that the application can access.
The four navigation methods really need no explanation
They are MoveFirst, MoveLast, MovePrev, and MoveNext
These Boolean Properties are set when an attempt is made to move beyond the beginning or end of the recordset.
| BOF | Beginning Of File |
| EOF | End Of File |
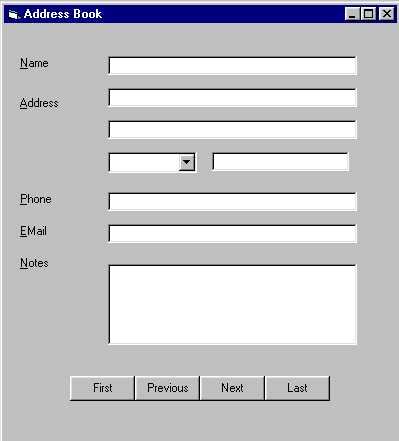
Change the User Interface adding four buttons and set the Data Control Visible Property to False. The program will now use the Command Buttons instead of the Data Control to move around the table.
Here is the new User Interface:
Example 2 - Write the Navigation Events
Add and Delete Logic
Add some additional buttons to the User Interface so that the user can Add and Delete rows from the table. The Save and Cancel buttons will work with the Add, allowing the user to abort the Add process. This additional button logic will also provide an implicit edit check for the user as entering "Add Mode" will also prevent them from pressing Delete, and deleting a row that is not in the table, or moving away from a row that has not yet been added.
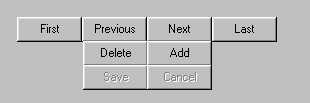
The User Interface may appear sloppy with the addition of the new buttons, but these buttons are placed and appear this way for demonstration purposes only. When the final step of this sequence is complete, the User Interface will be modified so that the buttons and their use is easier for the user.
| AddNew | Clears all bound controls. Must be followed by an Update or CancelUpdate. Moving away from the New row will automatically trigger the Update |
| Update | Saves any changes made to Bound Controls |
| CancelUpdate | Cancels any updates to Bound Controls and restores the original values to the User Interface |
| Delete | Removes the current row from the table. The User Interface is NOT updated, so the application should move to the next or previous row in the table |
This program supports two different modes of processing. They are Add Mode and Browse Mode. These "Modes" are not Visual Basic terms, but describe the "State" of the application at any given time. Normally, the program is in Browse Mode, and all of the buttons are enabled except for the Save and Cancel. When the user attempts to Add a new row, all the buttons are disabled except for the Save and Cancel. This action prevents the user from making mistakes, and makes the application easier to program as it does not need this type of edit logic.
Example 3 - Add and Delete, and Some Button Control Logic
If you want something done, then do it yourself?
Bound Controls in many cases make programming easier, but often, you loose some flexibility for your application. When you depend on the features of the Data Control, you are also locked into its limitations. In this example, the first step is to unbind the TextBox controls from the Data Control. You can select all of the controls at one time and then blank out the Data Source property for all of them. This will prevent you from having to update them individually. The DataField property will remain in tact, but it has no meaning without the link to the Data Control
The Bound Controls provide the movement of the data between the table and the controls, so this feature must be programmed into this application. This code is trivial with the exception of one complication that is handled with a function call.
The application also "hooks" into two events fired by the Data Control
| Reposition | Application gets a look at the data before displaying it on the form. Fired prior to User Interface Update. Used to build the screen including any fields displayed conditionally base on content in the recordset. |
| Validate | Application gets a look at the new data entered on the form prior to update. Used to edit the data entered on the form. If the data is not acceptable, the operation that triggered the Validate can be cancelled. |
It is from these events that the subroutine to load the database from the screen and the subroutine to display the database content on the screen will be called.
The User Interface has again changed and at first examination appears especially confusing.
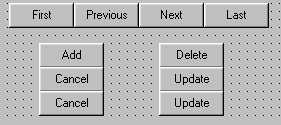
The additional Update / Cancel combination will be used to manually make updates to the table. One pair is for Adds, and now the second pair is for Updates. Many applications share the Event Handlers between these two modes, but I think it is simpler to isolate the logic in separate event handlers. The additional logic to display these buttons makes their functions clear to the user.
The Bookmark is a property of the Data Control and is used to store a location in the database. Is it a record number? Is it a key to a row? This is implemented as a class property and we don't know and we don't care about the details. We simply use the feature. In this application, it is used to reposition to a row after an Add Cancel. Using bound controls, this feature was provided, but without bound controls it is the responsibility of the application to reposition back to the original location.
The addition of Edit Logic complicates the Button Control Logic. This application watches for any change to the User Interface and places the program in Edit Mode when any modification is made. This allows the user to complete the Update or Cancel the update. A call to the Button Logic is placed in every user interface control's Change event.
Finally, the Form Unload Event must be monitored to make sure that the user does not start a change to a row and then attempt to exit the application before applying the change.
Example 4 - Unbound Controls and You Do It All Yourself
Lab 1 -From the Text - Page 476, VB Mail Order
Step by Step through the First Lab
Let me know when you are done and I will check you off as Complete
Lab 2 - From the Text - Page 476, VB Auto Center
You are on your own.
Reading Assignment
Programming Assignment
As Always: The assignment is due before the start of class next week