| CIS 147 Lesson 4 Project 7: Working with Tables |
Many Web pages often try to emulate the layout of magazines, complete with multiple columns, callouts (information you want to stand out), and illustrations. Using tables can help you achieve this look, without having to resort to painstaking hand coding. By placing images and blocks of text inside table cells, it is possible to create more interesting and elaborate web page layouts.
Setting the Table(s
Tables are constructed of rows, columns, and cells, just like spreadsheet programs. A row may span several columns, and a cell can span more than one row or column. A basic two-column, magazine-style layout can be achieved by using a single table row with three data cells: one for each column of text, plus an empty cell between them to create space between the columns.
Before you use a table as a layout tool on a web page it is a good idea to do a drawing of how you want the information to appear on the page. This will help you determine the number of rows and columns you need in the table. The reason you do a drawing is that is very difficult to add a column to a table and keep the right to left design layout in tact. Rows are not an issue in the design because they effect the length of the table but do not effect the design.
How to Create a Table in Nvu
To create a table click on the Table button.

The following dialog box will open.
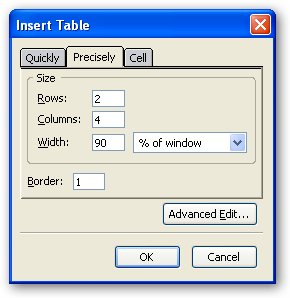
Switch to the Precisely tab, the dialog bow will look like the one below.
In this box you will enter the number of rows and columns you want the table to have.
You will also set the width of the table, there are two ways to set the with of a table % of window and pixels. When you use the % of window the table will appear in the browser window width as a percentage of that width. If you choose pixels the table will be a constant size measured in pixels and will not change based on the width of the browser window. Try the following experiment to see the difference.
Create a new page save it, name it Table Page 1 and give it a file name of TablePage1.
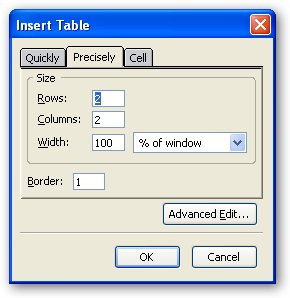
Click on the Table button. Fill in the information like the graphic below.
Click OKWith the cursor below the first table create a second table with the following filled in the dialog box
Click OK>
Note that the only change is the Width.
In the first two columns of the first table type table 1
In the first two columns of the second table type table 2
Save the page
Click on the browse button and click on Launch Application button.
Change the window from Maximize to Restore by clicking on the middle button in the upper right hand corner of the screen. Notice that the first table changes in size and the second one does not. This is the difference between and % and pixel width of a table.
Right click on the border of each table, from the menu that appears hover over Table Delete and from the menu select Table. This remove the test tables from the web page.
Invisible Tables
To make a table invisible to a web browser set the Insert table Border setting as shown below.

Create the above table notice that the table has a dotted red border. This indicates that the table border is set a 0.
In the first two rows type Table 1.
Save the table and view it in a browser by clicking on the Browse button.
You will see that the words are there but that no border appears around the words. You can use this to create a more interesting design system for your web pages.
Delete the table you just created.
Working With Cell Padding and Table Alignment
To create the space between the table cells and the information or images in the cells, you'll want to use a technique known as cell padding. Cell padding controls the amount of space between the edge of a cell and its contents. This will allow you to create interesting spacing schemes between the information and images on the web page.
To work with the cell padding do the following;
Create a Table with one row, one column, 90% and a border of 1.
Right click on a table you have created on your web page.
From the menu that appears hover over Table Select and from the list that appears click on Table. The cells in the table will have blue boarders.
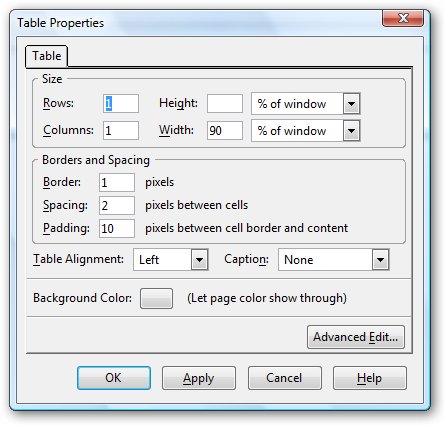
Right click in one of the cells and from the list that appears select Table Properties. You will see the following dialog box appear.
In the Borders and Spacing box you will see Padding. Changing the number in that box will change the number of pixels between the cell border and the content of the cell. To see how this works try the following:
Create a table with one row, one column width of 90% and a boarder of 1.
Right click on a table you have created on your web page.
From the menu that appears hover over Table Select and from the list that appears click on Table. The sells in the table will have blue boarders.
Right click in one of the cells and from the list that appears select Table Properties.
In the Table Properties dialog box change padding to 3.
Click inside the cell and insert one of the images you downloaded earlier.
Create a second table with one row, one column width of 90% and a boarder of 1.
From the menu that appears hover over Table Select and from the list that appears click on Table. The cells in the table will have blue boarders.
Right click in one of the cells and from the list that appears select Table Properties.
In the Table Properties dialog box change padding to 10.
Click inside the cell and insert the same image you put in the first table..
Save the page and click on the Browse button.
Notice the difference in the placement of the graphic and the boarder of the table.
Cell Padding of 3
Cell padding of 10
When you are done delete both tables.
Table Alignment
A table can be aligned to the left, center and right of a web page. To do this
Right click on a table you have created on your web page.
From the menu that appears hover over Table Select and from the list that appears click on Table. The cells in the table will have blue boarders.
Right click in one of the cells and from the list that appears select Table Properties. You will see the following dialog box appear.
Click on the down arrow next to Table Alignment and from the list select left, center or right to align the table to the page.
Project 7
In this project you will use tables to create well designed web pages.
Create the following pages
| Table Page 1 (already created) | TablePage1 |
| Table Page 2 | TablePage2 |
| Table Page 3 | TablePage3 |
| Table Page 4 | TablePage4 |
On the Home page
Redesign the page using tables to control the placement of the page header and all of the links to other pages.
Redo the links on the page using graphics as the links and text next to the links indicating where the links go.
Create a link on the Home page to Table Page 1 (TablePage1)
Using the text and graphics on the pages for project 6 create new designs for the information on the table pages.
Information on Image Page 1 (ImagePage1) = Table Page 1 (TablePage1)
Information on Image Page 2 (ImagePage2) = Table Page 2 (TablePage2)
Information on Image Page 3 (ImagePage3) = Table Page 3 (TablePage3)
Information on Image Page 4 (ImagePage4) = Table Page 4 (TablePage4)
When you have finished this part and published all of the pages send and e-mail me to grade Project 7. The subject for the e-mail should be Finished Project 7 (your name).
![]() Return to Home Page
Return to Home Page