| CIS 147 Lesson 2 Project 4 Part 1: Creating and Publishing a Web Page in Vista |
The File and Folder Structure of a Web Site
The web site itself is a single directory (labeled "mywebsite," although an alternate name would do as well). At the first "level" within that directory are three components: the "index" page (which is the "home" page), and two folders or subdirectories, each containing either the rest of the HTML documents that comprise the "site," or the images and other non-HTML files associated with those pages.
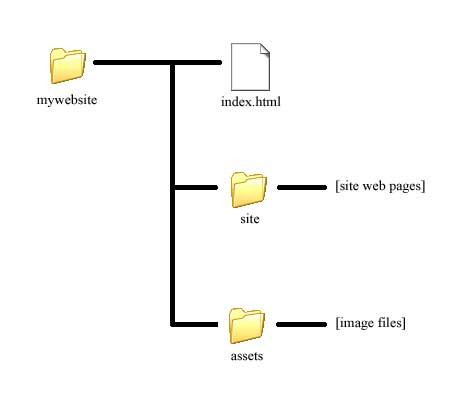
The advantage of this structure, so far as browsers and search engines are concerned, should be relatively plain: in particular, the fact that the "home" or "index" page is located near the top of the hierarchy means that it will be more readily "found" by search engines, with the result that this page should be placed relatively near the top of the list of "hits" that are generated through a web search. So too is it easier for both the designer and the user's browser to locate HTML and graphic files, and relate them logically to each other, because they have been placed in consistent locations.
Finally, of course, it is simply easier to manage your files and information when they are structured in this way. Note that nothing precludes a further division of the "assets" and "site" folders into further sub folders, to better facilitate the organization of your site by content. (This is really only necessary, however, when your site consists of a great number of separate files that are logically distinguishable by content or format). Equally, many designers add a folder to the two that are found in the main directory: a "notes" folder can be used to hold designer notes, templates, etc.; these are generally not accessible to users, but are there for the designer's reference.
The key components, then, of your site should be as follows:
1) A "root" or "main" directory, that contains the web site in its entirety.
2) An "index" or "home" page, that is placed at the highest level within this root directory. Note that, by convention, home pages are always given the file name "index": this name signals to the browser that this is the page in the folder to be opened by default. The name "index" applies only to the file name under which the document is saved, and need not be the name that you assign the page as it appears in the browser (see below, under Setting Page Properties).
3) An "assets" folder, within which you consistently store your image files. (Other files that might appear here include "Flash" files, sound and animation files, CSS files, and other specialized web documents that we will not be covering).
4) A "site" folder, within which are placed all of your HTML files, with the sole exception of the "index" file.
There are a number of ways to create the structure shown above, you can use Windows explorer or you can use the Web Site creation program. In this case we will use Nvu to create this structure.
When Nvu starts a blank page is found in the Page Area of the Nvu Window.
Information:
To see all the parts of the Nvu main window open the Users Guide and click on Using Nvu or you can click on the link below, sometimes this link will take you directly to the page in the Nvu Users Guide. This web page will open in a separate browser window.
One of the important steps that must be done when you work with web pages is to save them on a regular basis. When ever a new Web page is created you should immediately save it to your Web site. In the next steps you will save your first Web page and create the root directory for your Web site.
1. On the Composition toolbar click the Save button.
2. The first time you save a Web page a dialog window (like the one below) will ask you to enter a title for the page. The title of a page is what appears in the blue bar at the top of the browser when the page is opened. This is not the file name for the Web page.
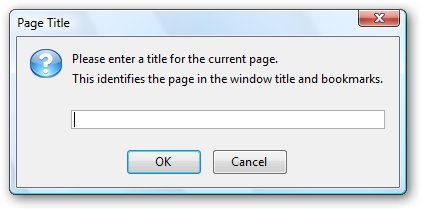
3. In the box enter Home Page for (your name) and press OK.
4. The following dialog box will appear in Vista.
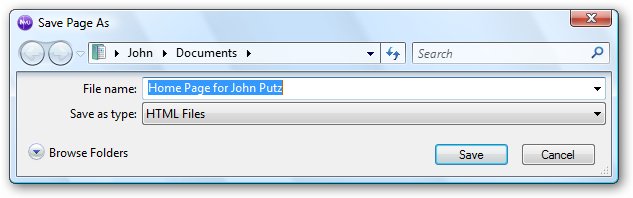
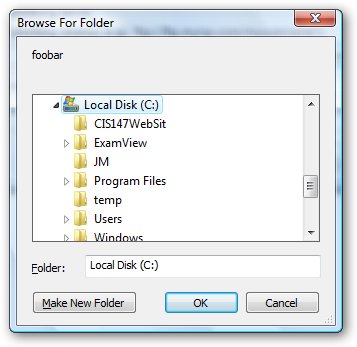
5. Click on the Browse Folders Button, the following window will open.
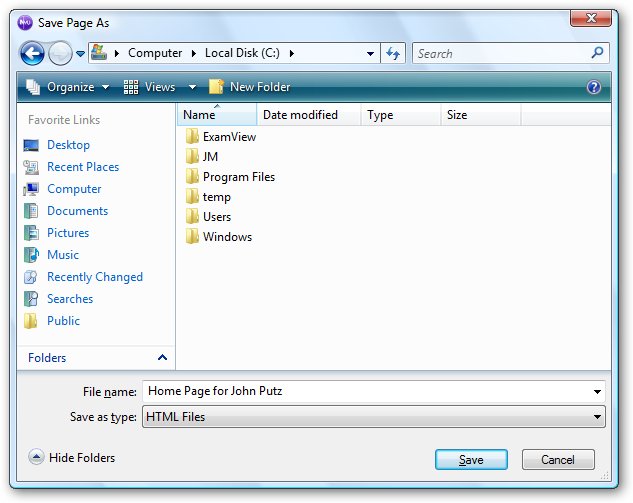
6. Navigate to the C drive of your copter (the image above is located on the Computer Local Disk C.
7. Click on the New Folder button.
8. You will create a New Folder at the bottom of the list of folders on the screen, like the image below.

9. Type CIS147WebSite to replace New Folder
10. In the box next to File Name replace Home Page for (your name) with Index and press the Save button.
11. Notice that the tab at the top of the page now has Home page for (your name) as its title.
12. Type the following line of text at the top of the Web page, This is the home page for the Web site being developed by (your name).
13. Save the page.
Setup For Publishing Your Web Site
Before you can publish your first Web page you need the server information. E-mail me with the subject Ready to Publish. I will send you the information you need to complete this section of the lesson.
On the right side of the Nvu window is the Nvu Site Manager window. If you do not have this window on the right side open the View menu, hover over Show/Hide and from the list that appears select Site Manager.
Setting up the Local Site
1. Press the Edit Site button, the following dialog bow will appear

2. In the Site name box type CIS 147 Web Site
3. In the box under Publishing address, click the Select director button and browse to the C drive, the dialog box should look somewhat like the one below.
4. Click on the folder CIS147WebSite and press the OK button.
5. Press the OK button, the New Site Manager should look like this.
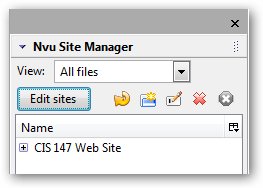
If you click on the + sign in the box you will see the file index.html.
Setting up the Remote Site
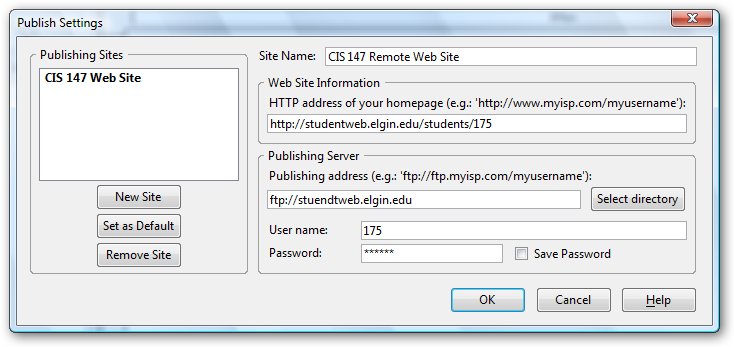
1. Press the Edit Site button, the following dialog bow will appear.
2. In the Site name box type CIS 147 Remote Web Site.
3. In the HTTP address enter the HTTP address I sent you in the e-mail.
4. In the Publishing address enter the Server address I sent you it will start with ftp.
5. In the User Name enter the user name I sent you.
6. In the Password enter the password I sent you.
7. Check the Save Password box. Note the password is case sensitive. Your dialog box should look like the one below. Note this is a screen shot of my remote site setup, yours will have your user ID and password not mine.
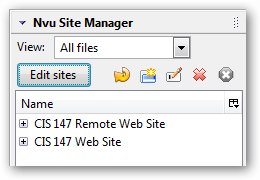
8. Press the OK button, your Nvu Site Manager should look like this.
Publishing your Web Page to the Site
1. Select the page you want to publish to the Web server (make sure that you have saved it).
2. Click on the Publish Button, the following dialog box will appear (if the publishing button is not live you have either not saved the file or published the page and have not saved it again).
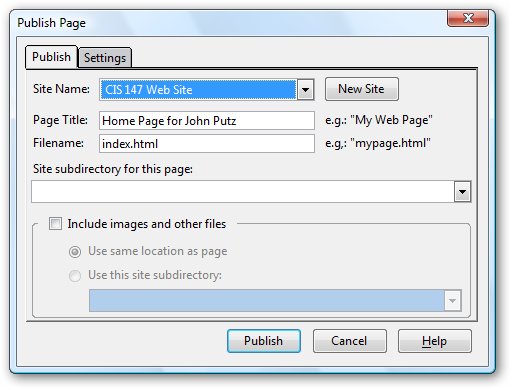
3. Click on the arrow next to the Site Name box and from the list select CIS 147 Remote Web Site.
4. Press the Publish button.
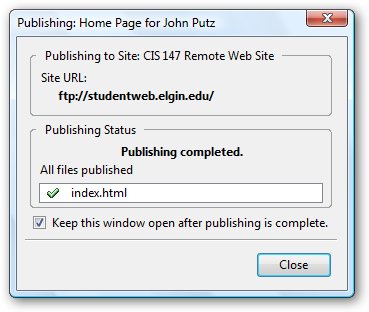
5. If you have entered all of the information for the remote site correctly you will see the following dialog box.
6. If you have made an error in entering the information for the Remote Site you will see the following;

7. You will have to check the information you entered by going back to the remote site setup.
If you have been successful you can now view your home page at the address supplied in the e-mail I sent you.
The address should be like the following
http://studentweb.elgin.edu/students/(your password).
When you have published your home page e-mail me to check it before you proceed to the next part of this lesson. The subject for the e-mail should be Finished First Page (your name).
![]() Return to Home Page
Return to Home Page